I don't much like writing to this blog from the New Post interface that blogger provides. It's too small and restricting. So, I've done a lot of googling to find out the best way of writing to a blog from Linux. One option I found was using Google Docs to create a text document (replete with rich text and images) and publish it to blogger.
I like the format of Google Docs and would certainly continue using it if it weren't for weird formatting incompatibilities between Google Docs and Blogger. In other words, when writing a blog post from Google Docs and submitting it to Blogger, what you see is not exactly what you get. I find that the text spacing and alignment become perverted when you submit a Google Docs text document to Blogger.
So, that's where the Google Data Python Library will come in handy! Using this set of Python modules, it's possible to upload photo media to the Picasa Web Album associated with your blog, get the associated URLs, and upload new blog posts containing your newly uploaded photos.
Using this functionality, I should be able to make a script that will take an HTML file that you create with any old web page editor, replace the links to images on your local hard drive with links to images on your picasa web album, and post your HTML file to Blogger!
Stay tuned. I'm hoping this ends up being better than Google Docs or Scribefire (I have issues with both platforms).
Wednesday, December 30, 2009
Monday, December 28, 2009
Your download activity in one file!
I started downloading a very big set of files today on bittorrent (using the simple and elegant Transmission Bittorrent Client that comes with Ubuntu). As I was watching the download speed indicator fluctuate up and down, the data analyst in me started stirring. I thought it would be neat if I could find a program that would output my download speed over time to a dataset that I could then analyze for trends, averages, highs and lows.

I inputted the term 'bandwidth' in Synaptic Package Manager to see what kinds of programs were available for this purpose. I found some simple command line programs such as nload, bmon, and iftop. All of them provide text-mode screens that help you monitor your bandwidth, but none of them allow you to output download speed over time to a plain text file.
After examining the man (manual) pages for each of these programs, I noticed a commonality: each of these programs sample bandwidth information from a file named dev in the /proc/net/ directory on my computer. Curious for more info, I navigated to that directory and opened up the file. Here's an example of what it looks like:
If you've spent any time messing around with your network connection settings in Ubuntu (or most other operating systems) then you'll recognize most of the row titles in the above image. Now, my computer is only connected to the net through a wireless connection to my Router/ADSL Modem. Therefore, I don't expect any significant data in rows other than the one titled wlan0.
Next is the neat step: Linux repeatedly updates the dev file with the total number of bytes and packets received since boot-up. All you need to do to find out the download speed in bytes/second is:
- Open the file
- Copy the numeric value just to the right of wlan0, under the bytes column
- Wait a second
- Do the same thing with the next value
- Subtract the two!
Of course nobody in their right minds would want to do this manually, but the implementation of the above algorithm is very simple in Python:
def get_bytes():
dev = open('/proc/net/dev','rb').read()
import re
pat = re.compile('wlan0:\s*([0-9]+)\s*')
return int(pat.search(dev).group(1))
dev = open('/proc/net/dev','rb').read()
import re
pat = re.compile('wlan0:\s*([0-9]+)\s*')
return int(pat.search(dev).group(1))
def get_kbps():
import time
bytes1 = get_bytes()
time.sleep(1)
result = round(((get_bytes() - bytes1)/1000.0),1)
return '%3.1f' % result
import time
bytes1 = get_bytes()
time.sleep(1)
result = round(((get_bytes() - bytes1)/1000.0),1)
return '%3.1f' % result
The first function above simply opens the dev file and returns the numeric value beside wlan0. The second function uses the first function to get the bytes value two times and calculates Kilobytes/second (it's a smaller number than bytes/second).
I'm now using these functions to calculate Kilobytes/second every 3 seconds for a total of 4 hours to get my dataset! If you'd like to use these functions just remember that if you're using a wired ethernet connection, change wlan0 to eth0 and you will be able get your data.
Saturday, December 26, 2009
Permissions, Samba Sharing an External NTFS drive, and fstab
For my first post on this blog I wrote about setting up samba shares for my printer and external hard drive. When I wrote that entry, I thought I finally succeeded in sharing both devices. I was disappointed to learn that my solution was temporary, and my external USB hard drive was still unable to be shared with my wife's Windows XP machine.
After hours and hours of pursuing the solution to this problem like Captain Ahab come to life, I started to realize that my problem wasn't anything to do with Samba itself, but the permissions that were automatically assigned to my external hard drive upon its mounting. Every time I looked at the extended information given by the ls -l command in my /media directory, I saw the following:
drwx------ 1 inkhorn inkhorn 4096 2009-12-06 18:24 backup
In other words, my external hard drive was mounted so that I personally would have read, write and execute access to the drive, that I could mount and unmount it, but nobody else could access my drive in any way at all.
From googling my problem, I learned that if you modify the fstab (file system table) file in the /etc directory, you can change the permissions linux assigns to your hard drive when mounting it. I found numerous message board postings with examples of how to set up an entry for your hard drive in the fstab file, but none of them helped for very long. Finally I found a web page that described a program available to Ubuntu users called pysdm (Python Storage Device Manager) that provides a GUI allowing the user to set permissions for any attached storage devices.

As you can see above, it displays all connected partitions and provides an Assistant button that allows you to choose your mounting options intelligently. In my case, without having a USB stick connected first, my external hard drive shows up as partition sdb1, or /dev/sdb1.

When you click on the Assistant button, you're brought to the above Select options window. Most of these options were already set as enabled when this window popped up. I think the only option here that I changed was to enable Allow a user to mount and unmount the file system.

I then found an option I thought might be important in the Miscellaneous tab. I enabled the option above labelled This file system requires network. So, I pressed OK, then at the main window I pressed the Apply button. There was one catch however: the line that it automatically entered into my /etc/fstab file linked the partition to the mounting point, not the device itself. See the fstab entry below:
/dev/sdb1 /media/backup ntfs nls=iso8859-1,_netdev,umask=000,user,owner 0 0
In other words, what this entry in my fstab file says is that any time partition /dev/sdb1 comes online, mount it to /media/backup; even if /dev/sdb1 is my USB stick, and not my external hard drive! You see what I mean?
This is where what's called the UUID comes in handy. The UUID is an alphanumeric sequence that uniquely identifies each connected storage device independently of the partition assigned to that device. After all, if I connect my USB stick and then my external hard drive, it's my USB stick that would show up as partition sdb1, while my external hard drive would show up as partition sdc1. In order to make sure that it's my external hard drive that gets mounted as /media/backup and not my USB stick, I had to replace /dev/sdb1 with the UUID. To find out the UUID of a connected device, go to the terminal and type in sudo blkid. Here's the output on my terminal:
inkhorn@inkhorn-laptop:/media$ sudo blkid
/dev/sda1: UUID="2fb4ca03-eca7-41f8-9767-bbfaf88a1890" TYPE="swap"
/dev/sda2: UUID="34B836C6B8368700" LABEL="S3A6134D002" TYPE="ntfs"
/dev/sda5: UUID="ece79ff2-c123-4a72-80a9-c187b2cfd785" TYPE="ext4"
/dev/sdb1: UUID="010C7CC23301CA6C" LABEL="backup" TYPE="ntfs"
So, I opened up the fstab file again and replaced /dev/sdb1 with UUID=010C7CC23301CA6C. I then saved the fstab file, restarted, and VOILA!!! My Samba share for my external hard drive is finally accessible from my Wife's Windows XP machine!
If you want to install pysdm on your Ubuntu system, type the following in your terminal:
sudo apt-get install pysdm
Then you can access it through the following menu items: System > Administration > Storage Device Manager.
After hours and hours of pursuing the solution to this problem like Captain Ahab come to life, I started to realize that my problem wasn't anything to do with Samba itself, but the permissions that were automatically assigned to my external hard drive upon its mounting. Every time I looked at the extended information given by the ls -l command in my /media directory, I saw the following:
drwx------ 1 inkhorn inkhorn 4096 2009-12-06 18:24 backup
In other words, my external hard drive was mounted so that I personally would have read, write and execute access to the drive, that I could mount and unmount it, but nobody else could access my drive in any way at all.
From googling my problem, I learned that if you modify the fstab (file system table) file in the /etc directory, you can change the permissions linux assigns to your hard drive when mounting it. I found numerous message board postings with examples of how to set up an entry for your hard drive in the fstab file, but none of them helped for very long. Finally I found a web page that described a program available to Ubuntu users called pysdm (Python Storage Device Manager) that provides a GUI allowing the user to set permissions for any attached storage devices.
As you can see above, it displays all connected partitions and provides an Assistant button that allows you to choose your mounting options intelligently. In my case, without having a USB stick connected first, my external hard drive shows up as partition sdb1, or /dev/sdb1.
When you click on the Assistant button, you're brought to the above Select options window. Most of these options were already set as enabled when this window popped up. I think the only option here that I changed was to enable Allow a user to mount and unmount the file system.
I then found an option I thought might be important in the Miscellaneous tab. I enabled the option above labelled This file system requires network. So, I pressed OK, then at the main window I pressed the Apply button. There was one catch however: the line that it automatically entered into my /etc/fstab file linked the partition to the mounting point, not the device itself. See the fstab entry below:
/dev/sdb1 /media/backup ntfs nls=iso8859-1,_netdev,umask=000,user,owner 0 0
In other words, what this entry in my fstab file says is that any time partition /dev/sdb1 comes online, mount it to /media/backup; even if /dev/sdb1 is my USB stick, and not my external hard drive! You see what I mean?
This is where what's called the UUID comes in handy. The UUID is an alphanumeric sequence that uniquely identifies each connected storage device independently of the partition assigned to that device. After all, if I connect my USB stick and then my external hard drive, it's my USB stick that would show up as partition sdb1, while my external hard drive would show up as partition sdc1. In order to make sure that it's my external hard drive that gets mounted as /media/backup and not my USB stick, I had to replace /dev/sdb1 with the UUID. To find out the UUID of a connected device, go to the terminal and type in sudo blkid. Here's the output on my terminal:
inkhorn@inkhorn-laptop:/media$ sudo blkid
/dev/sda1: UUID="2fb4ca03-eca7-41f8-9767-bbfaf88a1890" TYPE="swap"
/dev/sda2: UUID="34B836C6B8368700" LABEL="S3A6134D002" TYPE="ntfs"
/dev/sda5: UUID="ece79ff2-c123-4a72-80a9-c187b2cfd785" TYPE="ext4"
/dev/sdb1: UUID="010C7CC23301CA6C" LABEL="backup" TYPE="ntfs"
So, I opened up the fstab file again and replaced /dev/sdb1 with UUID=010C7CC23301CA6C. I then saved the fstab file, restarted, and VOILA!!! My Samba share for my external hard drive is finally accessible from my Wife's Windows XP machine!
If you want to install pysdm on your Ubuntu system, type the following in your terminal:
sudo apt-get install pysdm
Then you can access it through the following menu items: System > Administration > Storage Device Manager.
Friday, December 25, 2009
Schedule a delayed shutdown
Several times I've initiated a download of a big movie file late at night before I go to bed. Without knowing anything else, I'd normally have to leave my computer on all night just so that I could download that movie file that will probably only take up 3 hours. Wouldn't it be nice if you could tell your computer to turn off after the time it takes to download something?
That's where the shutdown command in bash comes in handy! Here's an example of the way I usually use it:
sudo shutdown -P 300
Firstly, you need to have root access to use shutdown, hence my use of the sudo command. I used -P to indicate that I want to power off after shutdown (as opposed to rebooting, or 'halting'). Finally, I typed 300 to indicate that I want the computer to shutdown in 3.5 hours (300 minutes).
Another way you can use the command is by specifying the clock time at which you want your computer to shutdown in 24 hour format. So let's say you want your computer to shut down at 4:15pm:
sudo shutdown -P 16:15
Type that in and your computer will shut down at 4:15pm. That's it!
Tuesday, December 22, 2009
Split files into parts easily in bash
These days, USB sticks have obliterated the worry of not being be able to carry computer files from one computer to another. However, there will be instances when you'll be tempted to email a file to someone and that file will be too big to attach to your email. Whatever do you do!?!
This is where the split command in your Linux terminal comes in handy. Let's say you have an .mpg file that runs for roughly 25 minutes and happens to take up 40 megabytes (e.g. 'speeches from wedding video.mpg'). Let's also say that your email server will accept attachments of maximum 10 megabytes. So, we know that we need to split this .mpg file into 4 parts of 10 megabytes each.
Here's the command to use for the example file:
split -b 10000k 'speeches from wedding video.mpg' speeches.
Here's what the arguments mean:
Admittedly, this is a solution where the other person has to be a Linux user. The person on the other end has to navigate to the directory where the part files are stored and enter in the following command:
cat speeches.?? > 'speeches from wedding video.mpg'
Voila! Humpty dumpty has been put back together again :)
This neat Linux trick has been brought to you by an awesome book I'm currently reading called Linux All-in-One Desk Reference For Dummies. I heartily recommend it to Linux newbies!
This is where the split command in your Linux terminal comes in handy. Let's say you have an .mpg file that runs for roughly 25 minutes and happens to take up 40 megabytes (e.g. 'speeches from wedding video.mpg'). Let's also say that your email server will accept attachments of maximum 10 megabytes. So, we know that we need to split this .mpg file into 4 parts of 10 megabytes each.
Here's the command to use for the example file:
split -b 10000k 'speeches from wedding video.mpg' speeches.
Here's what the arguments mean:
- -b tells the split command that you want to specify the 'byte' size
- 10000k, or 10,000 kilobytes is the size of the parts we wanted (10,000 kilobytes = 10 megabytes)
- 'speeches from wedding video.mpg' is the file we want to split into parts
- speeches. tells the split command that all part files should begin with 'speeches.'
- speeches.aa, speeches.ab, speeches.ac, speeches.ad
Admittedly, this is a solution where the other person has to be a Linux user. The person on the other end has to navigate to the directory where the part files are stored and enter in the following command:
cat speeches.?? > 'speeches from wedding video.mpg'
Voila! Humpty dumpty has been put back together again :)
This neat Linux trick has been brought to you by an awesome book I'm currently reading called Linux All-in-One Desk Reference For Dummies. I heartily recommend it to Linux newbies!
Monday, December 21, 2009
Finding Files in Google Desktop and bash
Sometimes I want to find a file and I have no clue where it is. When I was using Windows Vista, this was a simple matter of using the native file searching utility, which dutifully searched for my lost file using the index it created of my hard drive. File indexing is an amazing thing to take advantage of. When your computer searches a file index, it gets results FAST!
If you don't have a file index (remember, it's literally a simple listing of every single file you've put on your computer in one relatively small database file) then your computer will have to loop through every single file on your computer, trying to match your search argument (e.g. 'Resume*.pdf') to the file names that it processes.
Today I'll talk about three linux programs for indexing and/or finding your files:
Google Desktop
Even if you are using windows, click on the link above and get this program. It's VERY convenient to use! Google Desktop will not only allow you to search for your files, but emails that you've sent and received as well! Once you download it, you will want to make sure that it builds an index of the directories in which your important files will be stored. As shown below, right click on the Google Desktop icon and click on Preferences. On my computer I have it indexing my home user directory and my USB drive root directory. You can of course add any extra folders you like by click on Add folder to search.


When you're sure that everything is set, click on Save Preferences and Google Desktop will start indexing your files! Bear in mind that the process is slow, so you'll have to give it several hours until it's done indexing everything. You can check on Google Desktop's progress in indexing by right-clicking on the Google Desktop icon, then on Index, then on Index Status. You'll then see its progress in indexing all of your files and emails.
What I really like about Google Desktop is the simplicity in finding and opening anything on your computer. Type your key combo, quick search box comes up, type in your search argument, click on the result matching the file you were looking for, then your file opens!
locate
As I understand it, Ubuntu 9.10 (and i'm sure basically every other distro of Linux) indexes all my files for me on some periodic basis. This is what enables the locate program to work in the terminal. locate searches through the generated file index database for a term of your choosing. So let's say I want to search for the manual I recently downloaded for my Hammer Drill, but I have no clue where it went! Here's how I would use the command to find my file:
inkhorn@inkhorn-laptop:/$ locate -i hammer
Here's what the arguments I used mean:
Here is the output from the locate command:
/home/inkhorn/Documents/Hammer Drill Manual.pdf
/usr/share/pixmaps/pidgin/emotes/default/hammer.png
/usr/src/linux-headers-2.6.31-15/arch/avr32/boards/hammerhead
/usr/src/linux-headers-2.6.31-15/arch/avr32/boards/hammerhead/Kconfig
/usr/src/linux-headers-2.6.31-15/arch/avr32/boards/hammerhead/Makefile
/usr/src/linux-headers-2.6.31-16/arch/avr32/boards/hammerhead
/usr/src/linux-headers-2.6.31-16/arch/avr32/boards/hammerhead/Kconfig
/usr/src/linux-headers-2.6.31-16/arch/avr32/boards/hammerhead/Makefile
The first result is the one I'm looking for! Now I know where to look to open my hammer drill manual.
find
The find command has to loop through each and every file in the directory you specificy in your search argument. If you told it to search the root directory '/' for a file with the word 'Hammer' in it, your computer would probably take an intolerably long time finding it. Happily enough, you don't need to do that and probably have an idea generally where it is. To use my hammer drill example:
inkhorn@inkhorn-laptop:/$ find /home/inkhorn -iname 'Hammer*.*'
Here's what the arguments I used mean:
Here is the output from the find command:
/home/inkhorn/Documents/Hammer Drill Manual.pdf
Cool thing is that the find command only outputs file results while the locate command outputs directory results! In this instance, the results came on screen really quickly.
Now for something even cooler: I can enter in a command that looks for a file that I'm interested in and opens it in a program that reads it! Here is what I would enter in if I wanted to look for the hammer drill menu in terminal and automatically open it up in an excellent PDF reader named Okular:
inkhorn@inkhorn-laptop:/$ find /home/inkhorn -iname 'Hammer*.*' -type f -exec okular '{}' \;
You've already seen the first part of the find command in action. The second part tells the find command to execute a program called 'okular' that should then take the find results as an argument. In other words, okular opens up the file listed in the find output.
You can use this to open up other file types that you want to find. If you're looking to open a word document, replace 'okular' with 'oowriter', a spreadsheet, replace 'okular' with 'oocalc'.
For more info on using find and locate, click here.
If you don't have a file index (remember, it's literally a simple listing of every single file you've put on your computer in one relatively small database file) then your computer will have to loop through every single file on your computer, trying to match your search argument (e.g. 'Resume*.pdf') to the file names that it processes.
Today I'll talk about three linux programs for indexing and/or finding your files:
- Google Desktop (for easy indexing and finding using a GUI)
- locate (for finding indexed files in bash/terminal)
- find (for finding files in bash/terminal)
Google Desktop
Even if you are using windows, click on the link above and get this program. It's VERY convenient to use! Google Desktop will not only allow you to search for your files, but emails that you've sent and received as well! Once you download it, you will want to make sure that it builds an index of the directories in which your important files will be stored. As shown below, right click on the Google Desktop icon and click on Preferences. On my computer I have it indexing my home user directory and my USB drive root directory. You can of course add any extra folders you like by click on Add folder to search.
Preferences are opened in your default browser
You may want to modify settings in the other tabs shown above. Go to the Gmail tab and follow the instructions there if you would like Google Desktop to index your gmail account. Also, go to Display and click on the Change Hotkey button lower down on the page in order to set up a key combination that will bring up a quick search box (shown below).My key combo: Shift+Control+?
When you're sure that everything is set, click on Save Preferences and Google Desktop will start indexing your files! Bear in mind that the process is slow, so you'll have to give it several hours until it's done indexing everything. You can check on Google Desktop's progress in indexing by right-clicking on the Google Desktop icon, then on Index, then on Index Status. You'll then see its progress in indexing all of your files and emails.
What I really like about Google Desktop is the simplicity in finding and opening anything on your computer. Type your key combo, quick search box comes up, type in your search argument, click on the result matching the file you were looking for, then your file opens!
locate
As I understand it, Ubuntu 9.10 (and i'm sure basically every other distro of Linux) indexes all my files for me on some periodic basis. This is what enables the locate program to work in the terminal. locate searches through the generated file index database for a term of your choosing. So let's say I want to search for the manual I recently downloaded for my Hammer Drill, but I have no clue where it went! Here's how I would use the command to find my file:
inkhorn@inkhorn-laptop:/$ locate -i hammer
Here's what the arguments I used mean:
- -i tells the locate program to ignore the case of your search term
- hammer is simply the search term
/home/inkhorn/Documents/Hammer Drill Manual.pdf
/usr/share/pixmaps/pidgin/emotes/default/hammer.png
/usr/src/linux-headers-2.6.31-15/arch/avr32/boards/hammerhead
/usr/src/linux-headers-2.6.31-15/arch/avr32/boards/hammerhead/Kconfig
/usr/src/linux-headers-2.6.31-15/arch/avr32/boards/hammerhead/Makefile
/usr/src/linux-headers-2.6.31-16/arch/avr32/boards/hammerhead
/usr/src/linux-headers-2.6.31-16/arch/avr32/boards/hammerhead/Kconfig
/usr/src/linux-headers-2.6.31-16/arch/avr32/boards/hammerhead/Makefile
The first result is the one I'm looking for! Now I know where to look to open my hammer drill manual.
find
The find command has to loop through each and every file in the directory you specificy in your search argument. If you told it to search the root directory '/' for a file with the word 'Hammer' in it, your computer would probably take an intolerably long time finding it. Happily enough, you don't need to do that and probably have an idea generally where it is. To use my hammer drill example:
inkhorn@inkhorn-laptop:/$ find /home/inkhorn -iname 'Hammer*.*'
Here's what the arguments I used mean:
- -iname tells find to ignore case when comparing your search argument string to the file names that it loops through
- 'Hammer*.*' tells it to look for a file of any extension (.*) starting with the word 'Hammer' and continuing with any other words after that (*)
Here is the output from the find command:
/home/inkhorn/Documents/Hammer Drill Manual.pdf
Cool thing is that the find command only outputs file results while the locate command outputs directory results! In this instance, the results came on screen really quickly.
Now for something even cooler: I can enter in a command that looks for a file that I'm interested in and opens it in a program that reads it! Here is what I would enter in if I wanted to look for the hammer drill menu in terminal and automatically open it up in an excellent PDF reader named Okular:
inkhorn@inkhorn-laptop:/$ find /home/inkhorn -iname 'Hammer*.*' -type f -exec okular '{}' \;
You've already seen the first part of the find command in action. The second part tells the find command to execute a program called 'okular' that should then take the find results as an argument. In other words, okular opens up the file listed in the find output.
You can use this to open up other file types that you want to find. If you're looking to open a word document, replace 'okular' with 'oowriter', a spreadsheet, replace 'okular' with 'oocalc'.
For more info on using find and locate, click here.
Saturday, December 19, 2009
Backing up your computer files with rsync
If you're paranoid about losing ages and ages of work you need to find a way of backing up your computer files! In Windows I would use a program called Save-n-Sync to make sure that a synchronized copy of all my work files could be saved on a backup source. In Linux this can be done with one command in the terminal using a shell program called rsync:
rsync -r -u --log-file=[path for your new log file] --stats [path for your source directory] [path for your target directory]
I'll explain the arguments:

Happy file-synchronizing! This program does a blazing fast job :)
rsync -r -u --log-file=[path for your new log file] --stats [path for your source directory] [path for your target directory]
I'll explain the arguments:
- -r tells it to recurse through the subdirectories of your specified source directory, meaning that it will synchronize files found directly in the source directory, but also files found within subdirectories inside your source directory.
- -u tells it that if a file is in both the source and target directory, it should only update the target directory file if it is an older version than the one in the source.
- --log-file=[path for your new log file] is the command you should use if you want the results of your file sync to be saved in a log file named however you like. For example: --log-file='/home/user/Desktop/Backup Log.txt'
- --stats tells it to output some useful file sync statistics for you such as how many files were scanned through, transferred, size of the transfer, etc.
- [path for your source directory] should be replaced with your source directory such as '/media/USB Stick'
- [path for your target directory] should be replaced with your target directory such as '/media/Backup Drive'
Creating launchers is simple!

- Right-click (or if you're a lefty, left-click) on your desktop and select Create Launcher
- The selection next to Type: should be left as Application
- Beside Name: you can put whatever you like to indicate that it's a Launcher for your backup command
- Now next to Command: put in your full rsync command with all the arguments discussed (or not) above
- Feel free to click on the icon box at the top left to select a more interesting icon for your backup launcher (i.e. select an icon, and press OK)
- Press OK when you're done and now you have a Launcher that you can double click whenever you need to back your stuff up!
Happy file-synchronizing! This program does a blazing fast job :)
Red-Eye Reduction in GIMP and Gwenview
I have many photos on my computer and a good portion of them tend to be of people whose eyes become red on account of the camera flash (despite the orange light my camera emits as it's taking pictures). In windows it's fairly easy to open up your red-eye affected photo and fix it up (practically in a few clicks of the mouse). How easily can we accomplish the same task in Ubuntu?
Today I'm going to load a cropped picture of two people with red-eye into two well-known programs in Ubuntu, GIMP and Gwenview.

Red-Eye Reduction in the GIMP
I'll trust that you know how to open a picture in any program and cut to the specifics. From here we have two ways to proceed:
(1) If there are other red colours in your picture that you want to preserve:


Hope your fine motor control is effective here!
Next you will see the Red-Eye Removal configuration window where it will ask you to choose a red-eye threshold. Above you can see that it gives you a preview of the eye that you're modifying. The default threshold value seems to work without a problem. So, press okay and move on to the other eyes in the picture.

(2) If the only intensely red colours in your picture are in the eyes:


Conclusion
The GIMP is a fantastic image manipulation program with so many features. However, I find that Gwenview is simpler to use for this purpose. My feeling is that many users wanting to edit photos will only want to do some of the simplest tasks: cropping, rotating, flipping and red-eye reduction, to name a few. As I've demonstrated here with red-eye reduction, Gwenview is a very simple program to use. To the user with such simple needs (I'm including myself here) I would recommend Gwenview. However I certainly plan on keeping GIMP on my computer as there are times when I need something above and beyond the simple stuff.
Today I'm going to load a cropped picture of two people with red-eye into two well-known programs in Ubuntu, GIMP and Gwenview.
The Offending Picture!
Red-Eye Reduction in the GIMP
I'll trust that you know how to open a picture in any program and cut to the specifics. From here we have two ways to proceed:
(1) If there are other red colours in your picture that you want to preserve:
- Select one of the red-eyes in your picture with the ellipse-select tool
- Click on the 'Filters' menu
- Click on the 'Enhance' submenu
- Click on 'Red-Eye Removal' (big surprise!)
Not so intuitive yet not too much to remember right?
The Result!
- Don't select anything in the picture
- Navigate to the 'Red-Eye Removal' filter as before
- Press okay at the threshold that looks best (probably the default)
Easy for this picture, but beware of pictures with other reds in them!
There's only one way of reducing red-eye in Gwenview and it is not very difficult:Red-Eye Reduction in Gwenview
- Open up your photo in Gwenview
- Under the 'Image Operations' pane, select 'Red Eye Reduction'
- When your mouse cursor turns into a cross-hair, select the middle of any one of the red-eyes that you want to fix
- A small circle will now appear on the spot where you clicked to 'de-red' the red-eye. You can change its size using the dark grey panel that appears below the picture
- When you're done, click apply and move on
Still need to have some good fine motor control skills here!

The Result!
Conclusion
The GIMP is a fantastic image manipulation program with so many features. However, I find that Gwenview is simpler to use for this purpose. My feeling is that many users wanting to edit photos will only want to do some of the simplest tasks: cropping, rotating, flipping and red-eye reduction, to name a few. As I've demonstrated here with red-eye reduction, Gwenview is a very simple program to use. To the user with such simple needs (I'm including myself here) I would recommend Gwenview. However I certainly plan on keeping GIMP on my computer as there are times when I need something above and beyond the simple stuff.
Monday, December 14, 2009
Thunderbird 3 - Nice and Polished!
Many years ago I used MS Outlook to organize my many emails, my calendar and my contacts. I liked Outlook alright until I finally got sick of how resource intensive it felt after years of use. I'm talking about the feeling you get when you hear the frantic clicking of your computer accessing stuff on your hard drive and executing processes like a type A personality on cocaine. So I felt the need for a change!
I discovered Mozilla Thunderbird and I never looked back. Thunderbird had (and still has) about all I can ask for. It loads fast, handles all sorts of email accounts (POP, IMAP, Gmail, Hotmail, etc), has a calendar plugin you can use called Lightning, and has BLAZING fast email search functionality!
The email search functionality of Thunderbird is perhaps my favourite feature. I actively use 3 email accounts and so accumulate A LOT of email from day to day! This is no matter for thunderbird, as it quietly indexes each and every email as they come in (or after you import your emails from another source). I most often use the 'Subject or Sender' search when looking for emails. Want to find an email? Type in a word or more from the subject, or type in the name of the person whosent it and WHAM, it shows you all the search results lickety split!
So, when I read recently that Mozilla came out with Thunderbird 3, I absolutely had to check it out!

For those of you who have seen Thunderbird before, you'll see that apart from some icon style changes, Thunderbird 3 introduces tabs to its email interface. I wasn't exactly waiting with baited breath for this feature, but you have to admit that Email clients might as well have tabbed interfaces now that all browsers have them.

Finally, I'm happy to report that searching for emails in Thunderbird 3 is just as good as it has ever been. There is at least one search type that I do not understand ('Recipient filter'.... How is that different from a 'To or CC filter'?) but that's okay because I rarely use anything other the 'Subject or From filter' search anyway.
(1) echo "deb http://switch.dl.sourceforge.net/project/ubuntuzilla/apt all main" | sudo tee -a /etc/apt/sources.list > /dev/null
(2) sudo apt-get update
(3) sudo apt-get install ubuntuzilla
(4) ubuntuzilla.py -a install -p thunderbird
Most of all, enjoy!
I discovered Mozilla Thunderbird and I never looked back. Thunderbird had (and still has) about all I can ask for. It loads fast, handles all sorts of email accounts (POP, IMAP, Gmail, Hotmail, etc), has a calendar plugin you can use called Lightning, and has BLAZING fast email search functionality!
The email search functionality of Thunderbird is perhaps my favourite feature. I actively use 3 email accounts and so accumulate A LOT of email from day to day! This is no matter for thunderbird, as it quietly indexes each and every email as they come in (or after you import your emails from another source). I most often use the 'Subject or Sender' search when looking for emails. Want to find an email? Type in a word or more from the subject, or type in the name of the person whosent it and WHAM, it shows you all the search results lickety split!
So, when I read recently that Mozilla came out with Thunderbird 3, I absolutely had to check it out!

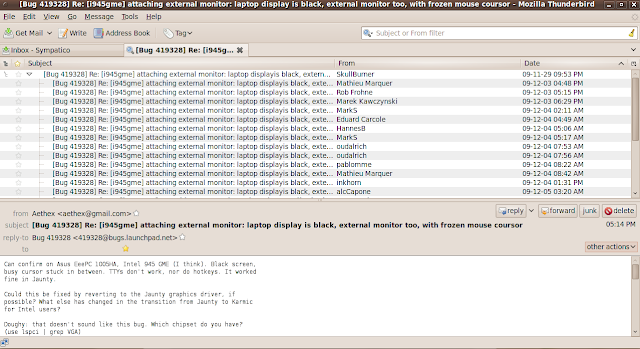
Thunderbird 3 Screenshot
For those of you who have seen Thunderbird before, you'll see that apart from some icon style changes, Thunderbird 3 introduces tabs to its email interface. I wasn't exactly waiting with baited breath for this feature, but you have to admit that Email clients might as well have tabbed interfaces now that all browsers have them.

New email opened in a tab
Want to see your email in a new window? Just click on 'other actions' then 'open in new window'. Another really cool feature you'll spot in the 'other actions' menu is 'show in conversation'. This threads all emails bearing the same subject line as part of one tree structure, where each reply to an email in that conversation creates its own branch.

'show in conversation' view. Google GMail meets Mozilla Thunderbird?
I think that the 'conversation' view is a much needed addition to Thunderbird's complement of tools to organize your email.
Finally, I'm happy to report that searching for emails in Thunderbird 3 is just as good as it has ever been. There is at least one search type that I do not understand ('Recipient filter'.... How is that different from a 'To or CC filter'?) but that's okay because I rarely use anything other the 'Subject or From filter' search anyway.
So, if you're using Windows or Mac, go here, or if you're using Ubuntu, paste the following 4 lines (taken from the Ubuntuzilla project site) into your terminal:
(1) echo "deb http://switch.dl.sourceforge.net/project/ubuntuzilla/apt all main" | sudo tee -a /etc/apt/sources.list > /dev/null
(2) sudo apt-get update
(3) sudo apt-get install ubuntuzilla
(4) ubuntuzilla.py -a install -p thunderbird
Most of all, enjoy!
Sunday, December 6, 2009
Setting up file sharing in Ubuntu Linux
I made a BIG switch from Windows Vista to Ubuntu Linux a while ago. I have been able to figure out how to do nearly all of my computing tasks in Ubuntu that I need on a regular basis. The one thing I had a lot of difficulty with for some reason was file sharing.
My linux machine is wirelessly networked with my wife's Windows XP desktop and my own Windows XP netbook. I wanted to share my external backup hard drive over the network so that she could just copy-paste stuff right into the drive over the network.
For some reason I found that the simplest method just didn't work:
Finally file sharing and printer sharing are working at the same time :)
--------------- EDIT: Dec. 27, 2009----------------------
The above seems to work just fine for sharing folders on my main hard drive. To share my external drive it turns out I needed to jump through some hoops to change its permissions so that other people can read, write and execute files on it. See my latest blog post on the topic here.
My linux machine is wirelessly networked with my wife's Windows XP desktop and my own Windows XP netbook. I wanted to share my external backup hard drive over the network so that she could just copy-paste stuff right into the drive over the network.
For some reason I found that the simplest method just didn't work:
- Right-click on the icon for my backup drive in Nautilus
- Click on 'Sharing Options'
- Click on 'Share this folder'
- Click on 'Allow others to create and delete files in this folder'
- My printer share stopped working
- All my shares stopped working
- I could only view shares from her computer
- I put my computer name, "inkhorn-laptop", next to "netbios name = "
- I put my workgroup name, "MSHOME", next to "workgroup = "
- I changed [network-share] to read [backup-drive]
- Put the path to my backup drive, "/media/backup" next to "path = "
- I deleted the "force group" line, as that didn't seem to help
- I put the username I set up for my wife next to "force user = "
Finally file sharing and printer sharing are working at the same time :)
--------------- EDIT: Dec. 27, 2009----------------------
The above seems to work just fine for sharing folders on my main hard drive. To share my external drive it turns out I needed to jump through some hoops to change its permissions so that other people can read, write and execute files on it. See my latest blog post on the topic here.
Subscribe to:
Posts (Atom)

