I recently got full time employment in an organization that depends on Microsoft Exchange for all of its email and scheduling needs. So, something that I investigated as soon as I could was how I could get my Rogers HTC Dream (a.k.a. the T-Mobile G1) and my Ubuntu Linux Laptop to connect to my new employer's MS Exchange server to receive and send emails, and to do my scheduling.
I was delightfully impressed with how incredibly easy it was to set up my new MS Exchange-based email account on my HTC dream. I just navigated to the Data Synchronization submenu in my phone's settings menu, clicked on "Microsoft Exchange", entered in my new email address and my password, waited while it communicated with the server, and then voila it finished!
Unfortunately it was not that easy on Ubuntu! It took me a week before I found any answers on the internet, but I finally got my MS Exchange email and calendar account set-up in Thunderbird. I first tried to use Ubuntu's pre-installed Evolution Mail to connect to MS Exchange, but alas it didn't work.
The solution came in the form of a Gateway program called DavMail. The principle of this program is that it mediates a (POP3/IMAP/Caldav) connection between your email client and the MS Exchange server in a way that makes both parties happy. Although I haven't tried this with a program other than Thunderbird, it should in theory work alright.
Once you've downloaded and installed DavMail using the link above, make sure that you have Sun Java version 6 installed. To do so, type in sudo apt-get install sun-java6-bin. After you're finished, start up DavMail by navigating through the following Gnome menu items: Applications > Internet > Davmail. A yellow circular icon will appear in the Gnome system tray indicating that DavMail has started up. Right-click on that icon, then click on settings, and then input your organizations Outlook Web Access (OWA) address. It may be something like https://mail.domain.org/owa. Take note of the local ports that it's opening up for various services (e.g. POP3/IMAP/Caldav) to see what ports your programs will need to use to access those services.
The next step for me was enabling IMAP access to my MS Exchange email. You can choose POP3 if you like, but IMAP will ensure that you have access to all the email folders that you regularly access at work. The DavMail folks already set up a nice tutorial on how to set-up Thunderbird with IMAP, so go through the steps they've already posted (warning, their screenshots are in French. This shouldn't be a problem though, as their instructions are in English!). Once you've completed those steps, go into your Thunderbird Account Settings for your new account and make sure that the port number it uses for accessing your email through IMAP is the same as the DavMail setting (the default is 1143).
Next item of business is to set up your MS Exchange calendar through Thunderbird's Lightning extension. Again, the DavMail folks have covered the steps to do these so do read what they've posted. Now you should have access to your email and calendar from Thunderbird at home!
The caveat to all of this is that, as a Gateway program, DavMail has to be running for you to communicate with your employer's MS Exchange server. So, be sure to start up DavMail if you want to check your MS Exchange email/calendar. It would be nice if this functionality was native in Thunderbird, but oh well. At least these steps allow you to use Thunderbird at all!
Showing posts with label Email. Show all posts
Showing posts with label Email. Show all posts
Wednesday, March 17, 2010
Thursday, February 4, 2010
Alpine, Gmail, and SSH. How to make your computer send emails when you're not there!
Out of the many things I've learned in the past half year about using Linux, I find the concept of remote access of my computer through SSH to be the coolest. Periodically I will be away from home, and I'll realize that I need access to some file on my computer so that I can send it to someone. I recently learned how to set up a Secure Shell Server on my Ubuntu Linux laptop that I can access from my Android cell phone using an Android app called ConnectBot. Once I get into my computer, I can then open up a fantastic text-mode email program called Alpine and compose emails with files attached right from my computer's hard drive and then send them through my Gmail account. Nothing makes me feel more like a huge nerd than this!
Here's how I set up an SSH server and then install Alpine with access to my Gmail account (my Gmail is setup to check and respond from 2 additional email addresses, so the instructions are tailored to that scenario):
Next came two considerations: (1) I'm behind a router, and therefore needed to set-up port forwarding so that I'd be able to access my openSSH server remotely. If you have a router and forget this step then prepare for lots of frustration! (2) Even having port-forwarding set-up, who wants to remember and type in an IP address so that you can connect to your server? So I needed to sign up for a free dynamic hosting service that would give me a constant host name regardless of my IP address.
First, set a nickname up for your role; maybe the name of your email provider (i.e. Sympatico). Next, under Current Message Conditions and beside To Pattern put one of the (or the only) email address(es) that Gmail is checking for you (e.g. bill@sympatico.ca). This creates an expectation that whenever this email address is in the the To field of an email, Alpine will do whatever you tell it in your role.
Then, under Actions Begin Here and beside Set From put your name and then email address that Gmail is checking for you (e.g. Bill Nye <bill@sympatico.ca>).
Finally, under Uses Begin Here you need to make the following changes (if necessary): (1) Under Reply Use = make sure to highlight and press enter on Without Confirmation and (2) Under Compose Use = make sure to highlight and press enter on With Confirmation. This will make it so that if someone emails you at bill@sympatico.ca, when you reply to that email, Alpine will automatically put bill@sypmpatico.ca in the From email address and not bill@gmail.com.
When you're done, you can press E to exit the Role set-up. If you check two email accounts through Gmail like me, press A once more when you're in the Setup Role Rules screen in alpine and repeat the above instructions to set-up a role for your other email account.
Here's how I set up an SSH server and then install Alpine with access to my Gmail account (my Gmail is setup to check and respond from 2 additional email addresses, so the instructions are tailored to that scenario):
Setting up openSSH
First you need to install the openSSH server. Easily enough you just have to type in sudo apt-get install openssh-server into your terminal to get the server. Amazingly, it's ready right away to be used! I wanted the SSH server to use a different port than the default (port 22), so I opened up /etc/ssh/sshd_config and changed the port number on the 5th line to something that was wacky enough not to be predictable.Next came two considerations: (1) I'm behind a router, and therefore needed to set-up port forwarding so that I'd be able to access my openSSH server remotely. If you have a router and forget this step then prepare for lots of frustration! (2) Even having port-forwarding set-up, who wants to remember and type in an IP address so that you can connect to your server? So I needed to sign up for a free dynamic hosting service that would give me a constant host name regardless of my IP address.
Setting up Dynamic DNS hosting
I found a great tutorial on the Ubuntu Help Site for setting up Dynamic DNS hosting for your computer. Basically, I went to DynDNS, set-up an account for my computer, and then followed the instructions on the above-mentioned Ubuntu Help Site to install and configure ddclient. ddclient will periodically send updates to DynDNS so that the hostname they provide you with always points to your IP address. When you're done configuring all of this, you will then have a host-name pointing to your computer such as tommy.gotdns.com. That's a lot easier to remember than 40.831.391.33 right?Initial installation and set-up of Alpine
Next I set-up Alpine. Installing it was easy enough: sudo apt-get install alpine. Once it's installed, you have to set it up to work with your Gmail account. Refer to this tutorial from the University of Virginia for a tutorial on how to do that. Be sure that when you're in the Config screen of Alpine, look for the field named Inbox Path and enter in the following: imap.gmail.com/ssl/user=username@gmail.com . Be sure to replace 'username' with your own Gmail account username. This will make sure that when you start-up Alpine and go into your Message Index, you will see the emails in your Gmail Inbox right away, instead of having to navigate to that inbox.Configuring Alpine to send emails using different 'From' email addresses
Now, when I reply to emails that I've picked up using my Gmail account, I usually want to reply using different email accounts. When you're only using the web-based Gmail checker, it allows you to respond using the account that the email was downloaded from. I wanted to have that same functionality in Alpine. This is where the Alpine concept of a Role comes in handy. From the main screen of alpine, type the following keys (don't type the triangular brackets): S > R > R > A . This will bring you to a screen that allows you to set-up the conditions under which Alpine will let you send an email using a different From email address. First, set a nickname up for your role; maybe the name of your email provider (i.e. Sympatico). Next, under Current Message Conditions and beside To Pattern put one of the (or the only) email address(es) that Gmail is checking for you (e.g. bill@sympatico.ca). This creates an expectation that whenever this email address is in the the To field of an email, Alpine will do whatever you tell it in your role.
Then, under Actions Begin Here and beside Set From put your name and then email address that Gmail is checking for you (e.g. Bill Nye <bill@sympatico.ca>).
Finally, under Uses Begin Here you need to make the following changes (if necessary): (1) Under Reply Use = make sure to highlight and press enter on Without Confirmation and (2) Under Compose Use = make sure to highlight and press enter on With Confirmation. This will make it so that if someone emails you at bill@sympatico.ca, when you reply to that email, Alpine will automatically put bill@sypmpatico.ca in the From email address and not bill@gmail.com.
When you're done, you can press E to exit the Role set-up. If you check two email accounts through Gmail like me, press A once more when you're in the Setup Role Rules screen in alpine and repeat the above instructions to set-up a role for your other email account.
Saving your Gmail password in Alpine so that it doesn't prompt you all the time
Finally, you'll probably be annoyed with entering in your Gmail password every time you start up Alpine. Thanks to a helpful user on Ubuntu Forums, I found out a simple way of making Alpine save your password. Open up your terminal, change directories to your home directory, cd ~/, and then type in touch .pine-passfile. After that, run Alpine. It will ask you for your password on start-up, and on sending an email, only to save your password indefinitely so that you no longer have to type in your password all the time.Conclusion
Wow, those were a lot of very little steps which, put together, seem mountainous. However, now I can punch in my dynamic DNS hostname into ConnectBot on my Android cell phone, access Alpine and send emails with files attached right from my computer's hard drive! I also like that I can update my databases on the fly with important personal info, manage, and even turn my computer off from afar. It's quite neat and if you're into feeling nerdy, I highly recommend getting your own openssh server configuration.
Monday, December 14, 2009
Thunderbird 3 - Nice and Polished!
Many years ago I used MS Outlook to organize my many emails, my calendar and my contacts. I liked Outlook alright until I finally got sick of how resource intensive it felt after years of use. I'm talking about the feeling you get when you hear the frantic clicking of your computer accessing stuff on your hard drive and executing processes like a type A personality on cocaine. So I felt the need for a change!
I discovered Mozilla Thunderbird and I never looked back. Thunderbird had (and still has) about all I can ask for. It loads fast, handles all sorts of email accounts (POP, IMAP, Gmail, Hotmail, etc), has a calendar plugin you can use called Lightning, and has BLAZING fast email search functionality!
The email search functionality of Thunderbird is perhaps my favourite feature. I actively use 3 email accounts and so accumulate A LOT of email from day to day! This is no matter for thunderbird, as it quietly indexes each and every email as they come in (or after you import your emails from another source). I most often use the 'Subject or Sender' search when looking for emails. Want to find an email? Type in a word or more from the subject, or type in the name of the person whosent it and WHAM, it shows you all the search results lickety split!
So, when I read recently that Mozilla came out with Thunderbird 3, I absolutely had to check it out!

For those of you who have seen Thunderbird before, you'll see that apart from some icon style changes, Thunderbird 3 introduces tabs to its email interface. I wasn't exactly waiting with baited breath for this feature, but you have to admit that Email clients might as well have tabbed interfaces now that all browsers have them.

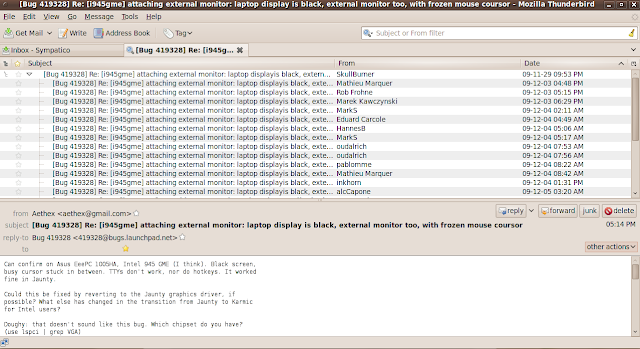
Finally, I'm happy to report that searching for emails in Thunderbird 3 is just as good as it has ever been. There is at least one search type that I do not understand ('Recipient filter'.... How is that different from a 'To or CC filter'?) but that's okay because I rarely use anything other the 'Subject or From filter' search anyway.
(1) echo "deb http://switch.dl.sourceforge.net/project/ubuntuzilla/apt all main" | sudo tee -a /etc/apt/sources.list > /dev/null
(2) sudo apt-get update
(3) sudo apt-get install ubuntuzilla
(4) ubuntuzilla.py -a install -p thunderbird
Most of all, enjoy!
I discovered Mozilla Thunderbird and I never looked back. Thunderbird had (and still has) about all I can ask for. It loads fast, handles all sorts of email accounts (POP, IMAP, Gmail, Hotmail, etc), has a calendar plugin you can use called Lightning, and has BLAZING fast email search functionality!
The email search functionality of Thunderbird is perhaps my favourite feature. I actively use 3 email accounts and so accumulate A LOT of email from day to day! This is no matter for thunderbird, as it quietly indexes each and every email as they come in (or after you import your emails from another source). I most often use the 'Subject or Sender' search when looking for emails. Want to find an email? Type in a word or more from the subject, or type in the name of the person whosent it and WHAM, it shows you all the search results lickety split!
So, when I read recently that Mozilla came out with Thunderbird 3, I absolutely had to check it out!

Thunderbird 3 Screenshot
For those of you who have seen Thunderbird before, you'll see that apart from some icon style changes, Thunderbird 3 introduces tabs to its email interface. I wasn't exactly waiting with baited breath for this feature, but you have to admit that Email clients might as well have tabbed interfaces now that all browsers have them.

New email opened in a tab
Want to see your email in a new window? Just click on 'other actions' then 'open in new window'. Another really cool feature you'll spot in the 'other actions' menu is 'show in conversation'. This threads all emails bearing the same subject line as part of one tree structure, where each reply to an email in that conversation creates its own branch.

'show in conversation' view. Google GMail meets Mozilla Thunderbird?
I think that the 'conversation' view is a much needed addition to Thunderbird's complement of tools to organize your email.
Finally, I'm happy to report that searching for emails in Thunderbird 3 is just as good as it has ever been. There is at least one search type that I do not understand ('Recipient filter'.... How is that different from a 'To or CC filter'?) but that's okay because I rarely use anything other the 'Subject or From filter' search anyway.
So, if you're using Windows or Mac, go here, or if you're using Ubuntu, paste the following 4 lines (taken from the Ubuntuzilla project site) into your terminal:
(1) echo "deb http://switch.dl.sourceforge.net/project/ubuntuzilla/apt all main" | sudo tee -a /etc/apt/sources.list > /dev/null
(2) sudo apt-get update
(3) sudo apt-get install ubuntuzilla
(4) ubuntuzilla.py -a install -p thunderbird
Most of all, enjoy!
Subscribe to:
Posts (Atom)

